Subscribe:
    Subscribe Twitter Facebook

    Wednesday, December 28, 2011

    How to Hack CCTV's with google?


    Google is the most friendly and also the most powerful search engine of the century. It helps millions and millions and people to get useful contents from the internet. But, not only the common people, but it also helps the hacker community a lot, and by some extent the most. We all are in an era of globalization and we find ourselves recorded by CCTV Camera and Spy Camera at various places like ATMs, Malls, Industries, Traffic, etc. Everywhere we are surrounded by camera. Then, why not try to hack these cameras from the internet to watch the live streaming remotely. And, in this illegal activity “Google” will actually help us.

                First, what we need to know is that there are plenty of Cameras all over the world which provide remote connectivity through the internet. These group of cameras are known as IP Cameras. The administrator only need to remember the IP Address of the camera and a username & password (if its password protected). But, many a time, these cameras are not. So, how to find such cameras online. Here, we go!


    You can search for the following combinations in google search:
    inurl:/view/index.shtml
    inurl:view/view.shtml
    inurl:”CgiStart?page=”
    inurl:/view.shtml
    intitle:”Live View / – AXIS
    inurl:view/view.shtml
    inurl:ViewerFrame?Mode=
    inurl:ViewerFrame?Mode=Refresh
    inurl:axis-cgi/jpg
    inurl:view/indexFrame.shtml


    We get About 4,520,000 results.
    So, enjoy each of them.

    Download the Google Book for free of cost.... A Small Trick....


    1. Open your Internet Explorer (Not Firefox). Make sure that you are the admin of your computer. Then, go to the page in books.google.com that you want to download.

    2. Now, go to "C:\Documents and Settings\%your admin name%\Local Settings\Temporary Internet Files\” of your computer. Delete all of the content of that folder.

    3. In your Internet Explorer, refresh the page and browse-thru the pages of the books that you want to download. ( you need scroll page by page until the last page of the book , make sure all pages are visible in the browser)

    4. Refresh the "Temporary Internet Files” folder. Copy all PNG files to another folder. You can distinguish PNG Files through its icon.

    These files that you have just copied are, actually, the pages of the books that you have just browsed. Put it in one folder then read with picasa or another photo manager software.

    Sunday, December 25, 2011

    Protect Ur folders in windows using a Small Script

    we're going to make a hidden folder, Folder will be hidden by a little program, when you open this program, you should type the correct password , so your folder will be seen. 


    OK, open any text editor (in fact notepad is the easiest way) and write in it :


    cls
    @ECHO OFF
    title Folder Locker
    if EXIST "Control Panel.{21EC2020-3AEA-1069-A2DD-08002B30309D}" goto UNLOCK
    if NOT EXIST Locker goto MDLOCKER
    :CONFIRM
    echo Enter password to lock folder or for cancel press N
    set/p "cho=>"
    if %cho%==XXXX goto LOCK
    if %cho%==n goto END
    if %cho%==N goto END
    echo Invalid choice.
    goto CONFIRM
    :LOCK
    ren Locker "Control Panel.{21EC2020-3AEA-1069-A2DD-08002B30309D}"
    attrib +h +s "Control Panel.{21EC2020-3AEA-1069-A2DD-08002B30309D}"
    echo Folder locked
    goto End
    :UNLOCK
    echo Enter password to Unlock folder
    set/p "pass=>"
    if NOT %pass%==XXXX goto FAIL
    attrib -h -s "Control Panel.{21EC2020-3AEA-1069-A2DD-08002B30309D}"
    ren "Control Panel.{21EC2020-3AEA-1069-A2DD-08002B30309D}" Locker
    echo Folder Unlocked successfully
    goto End
    :FAIL
    echo Invalid password
    goto end
    :MDLOCKER
    md Locker
    echo Locker created successfully
    goto End
    :End


    NOW ,replace the XXXX by the password you want 
    save it finally Folder_protect.bat

    Monday, December 19, 2011

    How to Face Autorun Virus with Windows 7

    Most of the people will suffer with this virus.... so much annoying .... ppl afraid to use their pen  drive in local cyber cafe ,,,,, Just a Simple Solution ......


    1. Open Run Task (Win button + R)

    2. Type : gpedit.msc

    3. Drill down to Computer Configuration –> Administrative Templates –> Windows Components –> Autoplay Policies –> Double click the Turn off Autoplay at the right side window.

    4. There are 3 configurations available : Not Configured, Enabled, Disabled.

    5. Choose Enabled then click apply .


    That's it ..... this  Virus will stop  spreading from removable media such as CD, USB, Floppy, etc. 

    Tuesday, May 10, 2011

    What is the Advantage of using custom DNS??

    1.Improve your security
    2.Speed up your browsing experience.


                 Coz of the open, distributed design of the Domain Name System, and its use of the User Datagram Protocol (UDP), DNS is vulnerable to various forms of attack. Public or “open” recursive DNS resolvers are especially at risk, since they do not restrict incoming packets to a set of allowable source IP addresses.


              As web pages become more complex, referencing resources from numerous domains, DNS lookups can become a significant bottleneck in the browsing experience


    Free Public DNS Server

    Service provider: Google
    • 8.8.8.8
    • 8.8.4.4

    Service provider: ScrubIt
    Public dns server address:
    • 67.138.54.100
    • 207.225.209.66

    Service provider:dnsadvantage
    Dnsadvantage free dns server list:
    • 156.154.70.1
    • 156.154.71.1

    Service provider:OpenDNS
    OpenDNS free dns server list:
    • 208.67.222.222
    • 208.67.220.220

    Service provider: vnsc-pri.sys.gtei.net
    Public Name server IP address:
    • 4.2.2.1
    • 4.2.2.2
    • 4.2.2.3
    • 4.2.2.4
    • 4.2.2.5
    • 4.2.2.6

    Friday, January 28, 2011

    How to Setup Default FTP Server Using IIS in Windows


    Earlier, I had written a post on how to turn your computer into a Windows file sharing server using a program called HFS. If you’re looking for a quick way to share the files on your local computer with friends or family, this is an easy way to do so.
    However, if you’re looking to setup your own FTP server in windows using IIS, you can do so, but it requires more technical knowledge. Of course, it also gives your more granular control over sharing and security, so it’s better for anyone who has a little computer know-how.

    How to setup and configure an FTP server in IIS

    The first thing you’ll need to setup your own FTP Server in Windows is to make sure you have Internet Information Services (IIS) installed. Remember, this only comes with Windows XP or Windows Vista Business or higher.
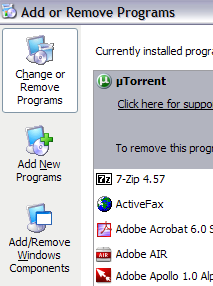
    Click on StartControl Panel and go to Add/Remove Programs. Then click onAdd/Remove Windows Components.
    add remove programs
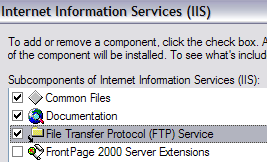
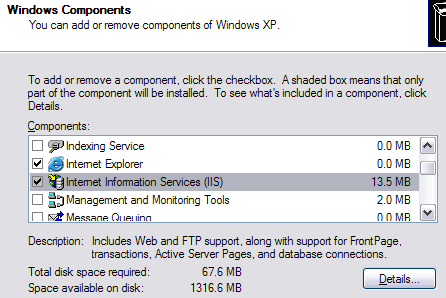
    In the components wizard, scroll down until you see IIS in the list and check it off. Before you click Next though, make sure you click on Details and then check off File Transfer Protocol (FTP) Service.
    iis
    file transfer protocol
    Click OK and then click Next. Windows will go ahead and install the necessary IIS files along with the FTP service. You may be asked to insert your Windows XP orWindows Vista disk at this point.

    Setup and configure IIS for FTP

    Once IIS has been installed, you may have to restart your computer. Now we want to go ahead and open the IIS configuration panel to setup our FTP server. So go toStart, then Control Panel and click on Administrative Tools. You should now see an icon for Internet Information Services.
    IIS[6]
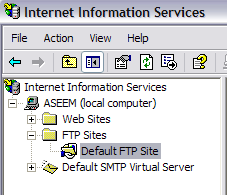
    When you open IIS for the first time, you’ll only see your computer name in the left hand menu. Go ahead and click the symbol next to the computer name and you’ll see a couple of options like Web Sites, FTP Sites, etc. We’re interested in FTP Sites, so expand that out also. You should see Default FTP Site, click on it.
    ftp site
    You’ll notice after you click on the default FTP site that there are a couple of buttons at the top that look like VCR buttons: Play, Stop, and Pause. If the Play button is greyed out, that means the FTP server is active. Your FTP server is now up and running! You can actually connect to it via your FTP client . I use Smart FTP, but you can use whatever you like best.
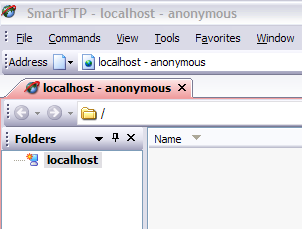
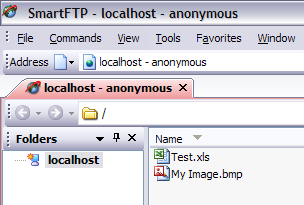
    Open your FTP client software and type in localhost as the host name and chooseAnonymous for the login. Connect and you should now see an empty folder.
    localhost
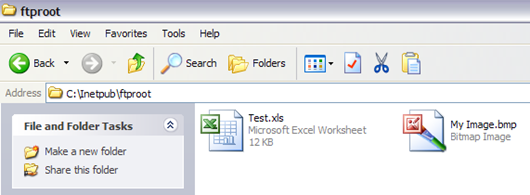
    Ok, so that’s step 1! Now where the heck is this folder that you are currently viewing? Well the default FTP site is actually located in C:\Inetpub\ftproot. Open this directory and dump some files into it.
    ftp files
    Now refresh on your FTP client and you should now see your files listed!
    ftp sites
    So you now have an up and running FTP server on your local computer. Before I show you how you can create separate folders that are stored in a different directory other than the default Inetpub folder, let’s first connect to our FTP server from another computer on the network.
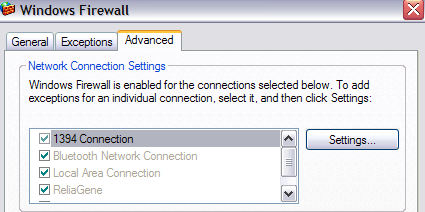
    In order to do this, you’ll have to open up the Windows Firewall to allow FTP connections to your computer, otherwise all external computers will be blocked. You can do this by going to Start, Control Panel and then clicking on Windows Firewall. Click on the Advanced Tab.
    windows firewall
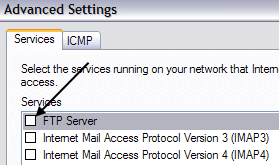
    Under the Network Connection Settings section, make sure all of the connections are checked in the left list and then click on the Settings button. You’ll now be able to open certain ports on your computer on the service your computer is providing. Since we are hosting our own FTP server, we want to check off FTP Server.
    ftp services
    A little popup window will appear with some settings that you can change, just leave it as it is and click OK. Click OK again at the main Windows Firewall window. You have now opened up the firewall for FTP connections. Now try to connect to your FTP site from a different computer on your network. You’ll need to get the IP address of the computer first before you can connect into it from a different computer.
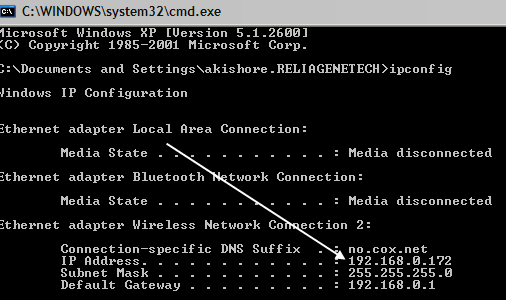
    Go to Start, click Run and type in CMD. Type IPCONFIG and jot down the number for IP Address:
    ip address
    In your FTP client on the other computer, type in the IP Address you just wrote down and connect anonymously. You should now be able to see all of your files just like you did on the FTP client that was on the local computer.
    Now that the FTP site is working, you can create as many folders as you like for FTP purposes. In this way, when a user connects, they specify a path that will connect to one specific folder.
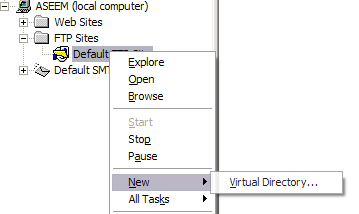
    Back in IIS, right click on Default FTP Site and choose New, and then Virtual Directory.
    virtual directory
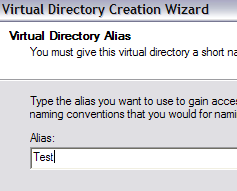
    When you create a virtual directory in IIS, you’re basically going to create an alias that points to a folder on the local hard drive. So in the wizard, the first thing you’ll be asked is for a alias name. Make is something simple and useful like “WordDocs” or “FreeMovies”, etc.
    virtual directory alias
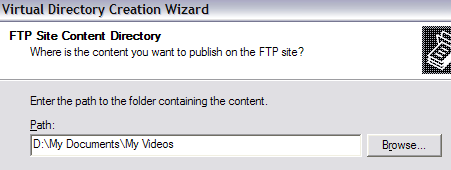
    Click Next and now browse to the path where you want the alias to refer to. So if you have a bunch of movies you want to share, browse to that folder.
    ftp server
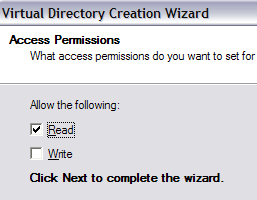
    Click Next and choose whether you want it as Read access only or Read and Writeaccess. If you simply want to share files, check Read. If you want people to be able to upload files to your computer, choose Read and Write.
    read write
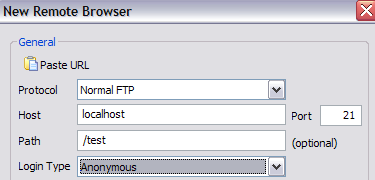
    Click Next and then click Finish! Now you’ll see your new virtual directory below the default FTP site. You can connect to you using your FTP client by putting in the Path field “/Test” or “/NameOfFolder”.
    ftp connection
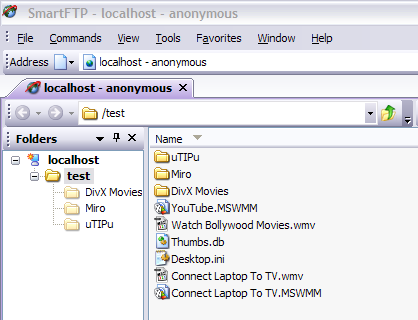
    Now you’ll only see the files that are in the folder we had browsed to.
    anonymouse
    And that’s about it! You can create as many folder as you like! The only thing other thing that you would need to do is to give out your public IP address to anyone who is connecting from outside of your internal network. If you want users to connect from anywhere in the world, you’ll have to give them your public IP address, which you can find out by going to http://whatismyipaddress.com/.
    Finally, you’ll need to forward the FTP port on your router to your local computer that is hosting the FTP server. Port Forward is a great site to show you how to forward ports on your router to computers on your home network.
    Bidvertiser